What if the best solar panel setup for canopy touring isn’t the one with the biggest panel? Wattage is only one part of the decision. Your fridge and other daily loads, battery capacity, charging options and time parked all affect whether the system can keep up.
It’s understandable to want a setup that powers your gear without adding unnecessary weight or complexity. In Auckland and across New Zealand, changeable weather and touring routines make it important to plan for realistic solar input rather than assume a panel will deliver its rated output every day.
This guide compares fixed canopy panels, portable panels and combined configurations, then explains how to match panel size and battery capacity to your needs. You’ll also learn what a charge controller and vehicle charging system do, and how to plan a safe, tidy installation around your canopy, storage and wider vehicle fit-out. The aim is a practical setup for the way you travel, with room to adapt if your power needs change.
Key Takeaways
- Build your solar panel setup for canopy around the gear you use and how long you’re parked, rather than choosing by panel wattage alone.
- Understand how panel output, battery capacity and charging components work together to supply your touring loads.
- Compare fixed, portable and combined panels to balance mounting space, sun exposure and flexibility at camp.
- Plan cable routes, ventilation, secure mounting and component placement as part of the complete canopy and vehicle fit-out.
Solar panel setup for a canopy: what should your system power?
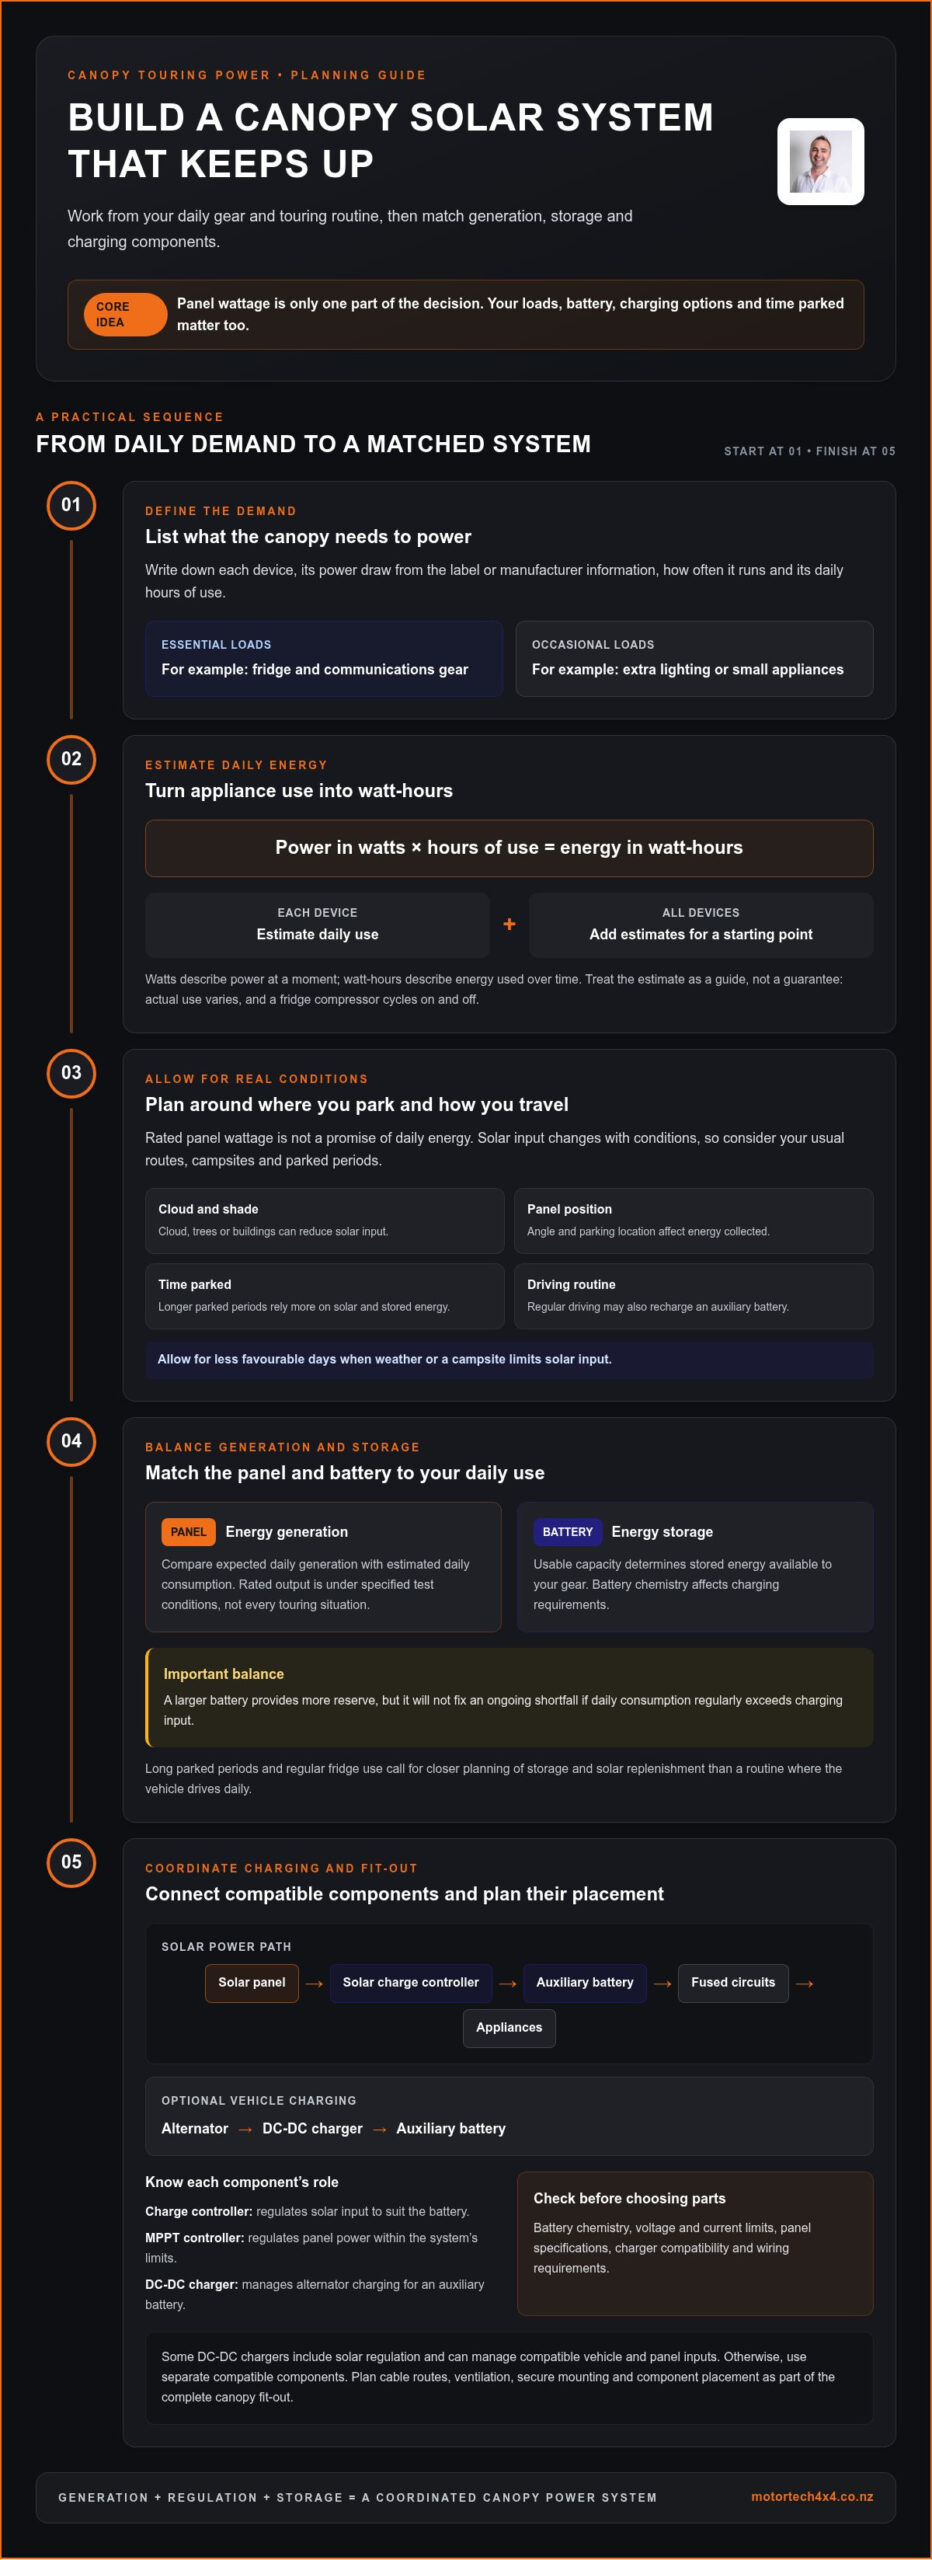
A canopy touring setup might need to run a fridge, lights, phones and communication equipment. Before choosing a panel, list the devices you’ll use, how often they’ll run and how long the vehicle will be parked. Design the solar panel setup for canopy around those daily demands, not panel wattage in isolation.
Solar input changes with conditions. Cloud, shade from trees or buildings, panel angle and parking location can all affect how much energy reaches the battery. A vehicle that moves regularly may also recharge its auxiliary battery while driving, while one parked for longer periods relies more heavily on solar and stored energy. Plan around your usual touring routine, including stretches when the weather or campsite limits solar input.
What do you want to run from your canopy?
Make a load list before selecting components. For each appliance, record its power draw from the label or manufacturer’s information and estimate its hours of daily use. Separate essential loads, such as a fridge or communications gear, from occasional-use items, such as extra lighting or small appliances.
A basic estimate is power in watts × hours of use = energy in watt-hours. Add the daily estimates for each device to get a starting point for comparing battery capacity and charging input. Treat this as an estimate, not a guarantee: a fridge’s compressor cycles on and off, and actual use varies with conditions and settings. Allow for days when solar input is reduced.
How does a canopy solar system work?
A canopy solar setup combines a panel, charging components, a battery and the appliances that use its stored energy. The panel produces electricity, the charge controller regulates the input to suit the battery, and the battery stores energy for the loads. This follows the basic arrangement of a stand-alone power system, with generation, regulation and storage working together.
Watts measure power at a given moment; watt-hours measure energy used over time. A device drawing power for several hours consumes more energy than the same device used briefly. Panel wattage describes rated power under specified test conditions, not the energy it will deliver in every touring situation. Compare expected daily generation with estimated daily consumption, then consider how much energy the battery needs to store between charging opportunities.
This initial assessment gives you a sound basis for choosing components and helps prevent a common mismatch: a panel that looks substantial on paper but cannot replace the energy your gear uses during a typical day away.
Canopy solar components: match the panel, battery and charging system
A well-matched system balances energy generation, storage and charging. The panel produces power, a charge controller regulates solar input, and the battery stores energy for appliances to use. Wiring, fuses and compatible connections complete the circuit. Together, these components provide a source of power at camp, one of the practical benefits of solar energy for off-grid travel.
Basic component flow: Solar panel → solar charge controller → auxiliary battery → fused circuits → appliances
Optional vehicle charging: Alternator → DC-DC charger → auxiliary battery
Some DC-DC chargers also include a solar regulator, allowing a compatible unit to manage input from both the vehicle and a solar panel. The right arrangement depends on the charger, battery and panel specifications.
What size solar panel and battery do you need?
Start with the daily energy estimate from your load list, then compare it with the energy the panel may collect during your usual trips. Rated panel wattage is not a promise of daily energy. Shade, panel angle, season and parking conditions all affect output, so allow for less favourable days rather than sizing the system for ideal exposure.
Battery choice matters too. Battery chemistry affects charging requirements, while usable capacity determines how much stored energy is available for your gear. Compare the battery specifications with appliance demand and the charging system’s settings. A larger battery provides more reserve, but it won’t solve an ongoing shortfall if daily consumption regularly exceeds charging input.
For example, a trip with long parked periods and regular fridge use calls for closer planning of storage and solar replenishment than a routine where the vehicle drives daily and can recharge from its alternator. Treat output estimates as illustrative, not a promise of performance in every New Zealand season or location.
Do you need a DC-DC charger or MPPT controller?
An MPPT solar controller regulates power from the panel to charge the battery within the system’s limits. A DC-DC charger manages charging from the vehicle’s alternator, helping deliver a suitable charge to an auxiliary battery. A unit with built-in solar regulation may combine these functions; otherwise, solar and alternator charging can use separate compatible components.
Before selecting parts, check battery chemistry, voltage and current limits, panel specifications, charger compatibility and wiring requirements. These details affect system operation and safe installation. A coordinated canopy, storage and electrical layout can also make the setup easier to use and expand. For broader planning, explore canopy and 4×4 fit-out options.
Fixed, portable or combined canopy solar: which setup fits your touring?
The right configuration depends on where you park, how often you move and how much usable space the canopy provides. A fixed panel is convenient for frequent travel, while a portable panel offers more freedom to find sunlight at camp. Combining both can add flexibility, but also requires more storage space and equipment. Use this comparison as a starting point, then match the choice to your touring routine and canopy layout.
| Configuration | Works well for | Main trade-off |
|---|---|---|
| Fixed panel | Frequent driving and a clear, suitable canopy roof | Convenient between stops, but the vehicle can’t move away from shade without repositioning the panel system. |
| Portable panel | Longer camps where the ute may be parked in shade | Can be placed in sun, but needs setting up, packing away and storage space. |
| Combined setup | Trips that mix frequent travel with longer stays in varied campsites | Offers more placement options, with added equipment and storage demands. |
When does a fixed canopy panel make sense?
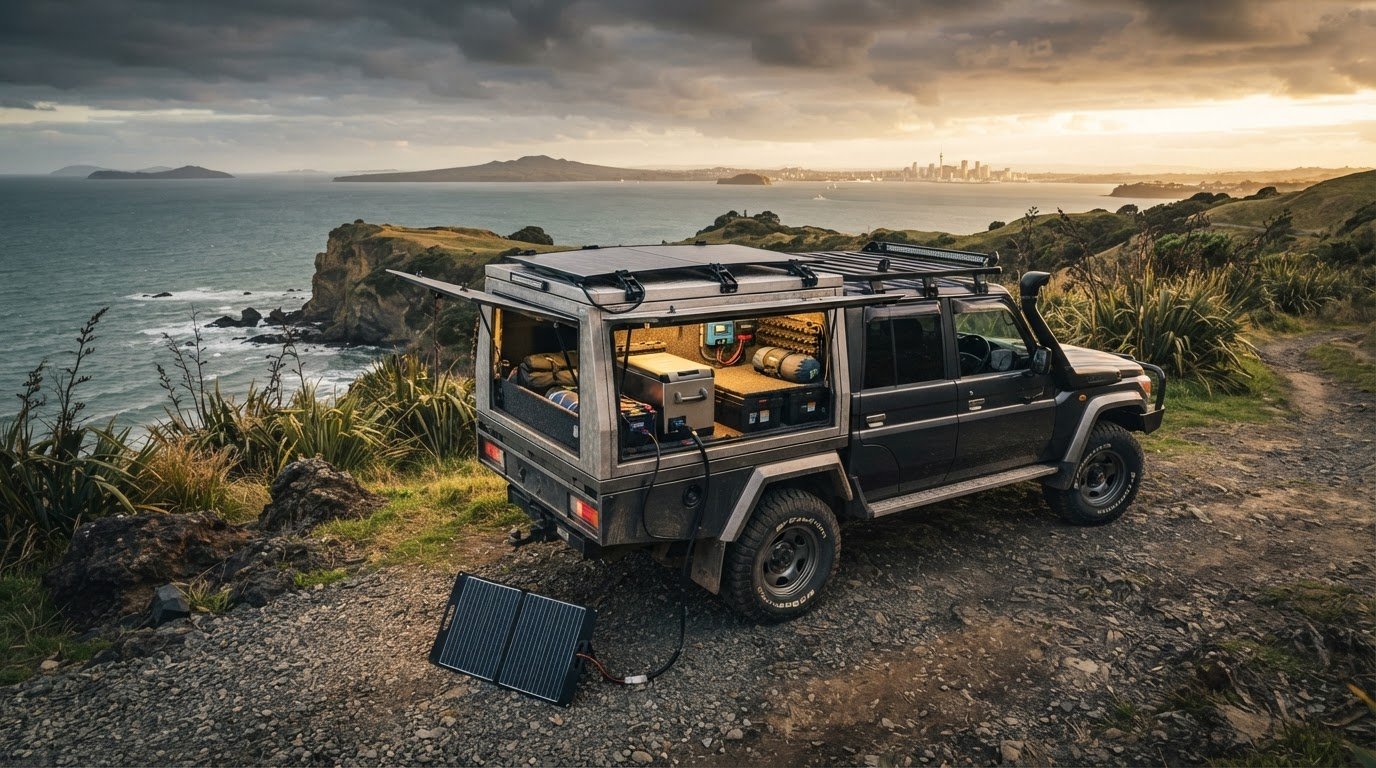
A fixed panel stays with the vehicle, so there’s no separate panel to unpack at each stop. It can suit touring with regular driving and short stays, provided there’s enough usable canopy surface for mounting. Consider roof obstructions, panel orientation and the likelihood of shade from trees or nearby terrain. The mounting method needs to suit the canopy’s construction and vehicle use, including vibration and access to storage—an area where quality fabricators like GWorks design heavy-duty aluminium canopies to accommodate roof accessories and off-road demands. A roof rack or other accessories may also reduce the available panel area.
When are portable or combined panels more practical?
A portable panel can be moved into sunlight while the ute stays parked in shade. That’s useful at a longer campsite, but it takes time to position and secure, and needs storage space in the canopy or vehicle when packed away. A combined setup pairs the convenience of a fixed panel with the flexibility of a portable one. It makes sense when your trips regularly call for both, rather than adding gear just in case.
Think about the whole storage plan before settling on a solar panel setup for canopy. A portable panel competes for space with camping gear, while fixed mounting may affect roof access or other accessories. The vehicle solar power system design report from Purdue University Northwest illustrates why vehicle integration and component layout belong in the planning process. The best configuration is the one that fits your vehicle, canopy and travel habits without compromising practical access.
Plan a safe canopy solar installation: sizing, wiring and fit-out checks
A reliable installation starts with the system layout, not the drill. Plan the panel, battery, charging components and cable routes together so they suit the canopy construction, touring use and equipment already fitted to the ute. Use this sequence to organise the work before installation begins.
- Confirm the loads. List the appliances, their expected daily use and which loads are essential. Use this inventory to guide panel, battery and charger selection.
- Measure the mounting area. Check the usable canopy surface, roof accessories, obstructions and likely shade. Keep access to doors, storage and equipment you need to reach.
- Plan component positions. Map where the battery, controller, charger and any monitoring equipment will sit. Keep them accessible for inspection and allow appropriate ventilation for the selected components.
- Design cable routes. Choose entry points and routes that avoid sharp edges, moving parts, heat and likely contact with stored gear. Protect cables from abrasion and secure them so vibration on touring roads can’t cause rubbing or strain.
- Check and test the completed system. Confirm component compatibility, connections and protective devices against the manufacturers’ requirements. Test charging from each intended source and check that connected loads operate as expected.
What should you check before mounting canopy solar?
Measure the actual roof area rather than relying on the canopy’s external dimensions. Consider panel orientation, shade from roof racks or other accessories, and whether the mounting position affects access. The mounting method must suit the canopy construction and account for vehicle movement and vibration. Plan cable entry to limit exposure to water, dust and movement, and make sure the route remains protected after storage drawers or other fit-out components are installed.
How do you keep the electrical installation reliable?
Cable size, protective devices and connections need to match the current, cable length and equipment specifications of the system. Poorly protected or loose wiring can cause faults, so secure connections and abrasion protection are essential. Battery placement also needs suitable ventilation and secure mounting for the battery type and installation location. These details are system-specific; work that requires electrical expertise should be planned or carried out by an automotive electrical specialist.
Safety check: Confirm polarity, cable ratings, fusing and charger settings against the component instructions before energising the system. Keep wiring clear of sharp edges and heat, protect entry points, secure the battery and components, and test charging and loads before touring. Don’t assume parts are compatible just because they share a voltage rating.
A well-planned solar panel setup for canopy should work with the canopy, storage and wider vehicle fit-out as one system. For help coordinating your canopy and 4×4 fit-out in Auckland, plan your vehicle fit-out.
Choose a canopy solar setup that works with your complete 4×4 fit-out
Your final choice should account for the ute, canopy layout, daily loads and length of your usual trips. A setup for short stops between driving days may differ from one intended to support a fridge and other gear through a long stay. Treat solar as part of the vehicle fit-out, alongside storage, access and how you use the canopy.
How does canopy design affect the solar setup?
Panel space competes with roof racks and other equipment, while drawer and fridge placement shape how much room remains inside for a battery and electrical components. Plan the layout together so cables, storage and appliances remain accessible rather than crowded. If you’re weighing up canopy styles, this canopy and hardlid comparison guide can help frame the storage decision. For roof-mounted equipment, consider available space and mounting arrangements alongside this roof rack buying and installation guide.
What should your final setup checklist include?
Bring the key decisions together before settling on a solar panel setup for canopy. Check that the complete layout suits both the vehicle and the way you tour:
- Loads: List the appliances and identify which are essential for each trip.
- Charging: Confirm whether charging will come from solar, the vehicle or both, and that the components are compatible.
- Storage: Allow practical space for the battery, controller, wiring and any portable panel.
- Placement: Check panel area, likely shade, roof-mounted equipment and access to the canopy.
- Trip pattern: Consider how often you drive, how long you stay parked and where you typically camp.
Round out your touring plan with this guide to essential vehicle-based camping gear. Motortech 4X4 brings canopies, hardlids and 4×4 fit-outs together in its Auckland offering, making coordinated vehicle planning part of the build. Use the checklist to clarify your priorities, then explore a fit-out suited to your ute and touring routine.
Build a canopy setup around the way you tour
A reliable canopy solar setup starts with your daily loads and travel routine, not panel wattage alone. Match expected energy use with suitable panel input, battery capacity and compatible charging components. Then choose fixed, portable or combined panels based on where you park, available mounting space and how long you stay at camp.
Plan the electrical layout alongside the canopy and storage. Fridge placement, drawers, roof racks, cable routes and battery access all affect how practical the finished fit-out will be. Safe mounting and correctly selected wiring and protective components matter as much as the equipment itself.
For Auckland drivers, Motortech 4X4 offers canopies, hardlids, vehicle accessories, servicing and fit-outs. Use your load list and touring plans as the starting point for a solar panel setup for canopy that suits your complete vehicle. Plan your canopy and 4×4 fit-out with Motortech 4X4 and get ready to tour with a setup designed around your gear.
Frequently Asked Questions
How many watts of solar do I need for a canopy setup?
Choose panel wattage by comparing your daily energy use with realistic solar input, not by selecting a panel size in isolation. Add up the energy used by your fridge, lights, phones and other gear, then consider how long the ute is parked and whether the panel may be shaded. Season, panel angle and cloud also affect output. For an Auckland touring setup, allow for variable conditions rather than relying on ideal output.
Can a solar panel on a canopy run a 12V fridge?
Yes, if the overall system can supply the fridge’s energy needs. The panel charges a suitable battery through a compatible controller, and the fridge draws power from that stored energy. Check the fridge’s expected consumption, battery’s usable capacity and likely solar input together. Fridge use can change with temperature, settings and access, so don’t assume a panel’s rated wattage alone will keep it running, particularly during shade or reduced sunlight.
Is a fixed or portable solar panel better for a 4×4 canopy?
Neither is best for every touring routine. A fixed panel is convenient because it stays mounted and can collect solar while you travel or stop, but its position is limited by the canopy roof and shade. A portable panel can be placed in better sun while the ute is parked, though it needs setting up and storage space. Consider trip length, campsite shade, roof accessories and canopy storage before choosing.
Do I need a battery for a canopy solar panel?
A battery is usually needed to store solar energy for later use, including when the panel is shaded or it’s dark. For a practical solar panel setup for canopy, the panel typically charges the battery through a controller, while appliances draw from the battery. Some equipment may be designed to run directly from solar, but output can fluctuate with sunlight. Check the equipment specifications and plan around the loads you need to power reliably.
Can I charge a canopy battery from both solar and the alternator?
Yes, if the charging components are designed to manage both sources and are compatible with the battery. A DC-DC charger with solar input may handle alternator and panel charging; another system may use separate charging components. Confirm the battery chemistry, charger settings, panel specifications and wiring requirements as a complete system. Correct component selection and installation are important, so use qualified automotive electrical expertise for system-specific work.
What size battery should I use for canopy solar?
Size the battery around your daily energy use, its usable capacity and how long you’ll be away from charging. A fridge running through a long parked stay needs more stored energy than devices used briefly between driving days. Battery chemistry affects charging requirements, so match the battery to the controller or charger. Include a reserve for periods when solar input is reduced, and check the manufacturer’s guidance for usable capacity and installation.
Can a canopy solar panel charge a battery while the vehicle is parked?
Yes. With a compatible charge controller and correctly connected battery, a canopy panel can provide charging while the engine is off. The energy collected depends on sunlight, shade, panel orientation and season, so charging may slow in cloud or when parked under trees. Appliances continue drawing energy during this time; if their use exceeds solar input, the battery will still lose charge. Plan around both charging conditions and expected loads.