The best 4×4 camping setup NZ isn’t the one with the most gear. It’s a balanced touring build that your vehicle can carry safely. A rooftop tent, roof rack, canopy, drawers and extra water all add weight. Choosing equipment without considering payload and Gross Vehicle Mass (GVM) can limit what you carry and affect how your vehicle performs.
It’s easy to feel unsure about what to buy first, because the right setup depends on your vehicle, passengers and planned trips. A weekend away on sealed and gravel roads calls for different priorities from a longer, more remote tour. Start with the essentials, then add equipment that solves a specific need.
This guide explains how to plan a capable setup around your vehicle, trip and total load. You’ll learn how to prioritise shelter, storage and camping gear, account for the weight of people and equipment, and decide when accessory selection, professional fitting or 4×4 servicing can support a reliable build. The goal is a practical system, not a pile of gear.
Key Takeaways
- Match your 4×4 camping setup NZ to trip length, passenger needs, terrain and access to facilities.
- Plan in order: understand vehicle capacity, define trip priorities, organise storage, then select compatible accessories.
- Compare lightweight weekend, storage-focused ute and longer-touring options by how you’ll use and access each item.
- Use a pre-trip checklist for your route, weather, vehicle condition, load and campsite rules.
- A specialist can help turn your touring priorities into a compatible accessory and fitment plan.
What a 4×4 camping setup in NZ needs to do
A camping setup is a coordinated system of vehicle storage, shelter and trip equipment, selected to suit the people travelling, the route and the time away. It’s more than a list of accessories. A roof rack, canopy or tent makes sense only if it suits the vehicle, carries what you need and works with the way you plan to camp.
Begin with the trip. Note how many people are travelling, how many nights you’ll be away, what activities you’ll do and whether you’ll have access to facilities such as toilets, showers or cooking areas. These details help determine what you need to carry, how much storage is useful and which type of shelter will suit.
A weekend at an established campsite may call for straightforward sleeping gear, food storage and a way to separate wet or muddy equipment. A longer self-supported tour may need more provisions, additional storage and a plan for managing water and waste. The more remote the itinerary, the less you can rely on facilities or quick access to supplies. Not every New Zealand trip needs specialised equipment, so match the build to the route you’ll actually take.
Start with the trip, not the shopping list
Separate essential needs from comfort upgrades. Safe vehicle operation, suitable shelter, warm bedding and enough food and water for the itinerary come before extras that simply make camp more convenient. Think through a typical day: where people sleep, where equipment goes, what you’ll need to reach while travelling and what can stay packed until camp. This makes it easier to prioritise useful gear and avoid buying accessories that duplicate a function.
What makes a setup suitable for New Zealand touring?
Conditions can change between regions and during a trip. Allow for wet weather, variable temperatures and a mix of sealed roads, gravel and other surfaces on your planned route. The type of four-wheel drive system is one part of a vehicle’s capability, but it doesn’t mean every track is suitable for your vehicle or itinerary. Choose equipment for the terrain you expect, rather than an imagined worst-case route.
Before departure, check current Department of Conservation information and local council guidance for campsite access, closures and camping restrictions. Confirm where you can stay and which facilities are available, then plan your gear around those conditions. Touring on an unsealed public road isn’t the same as driving an unformed track. Route access and vehicle suitability should shape your setup from the outset.
Build your 4×4 camping setup around vehicle capacity and use
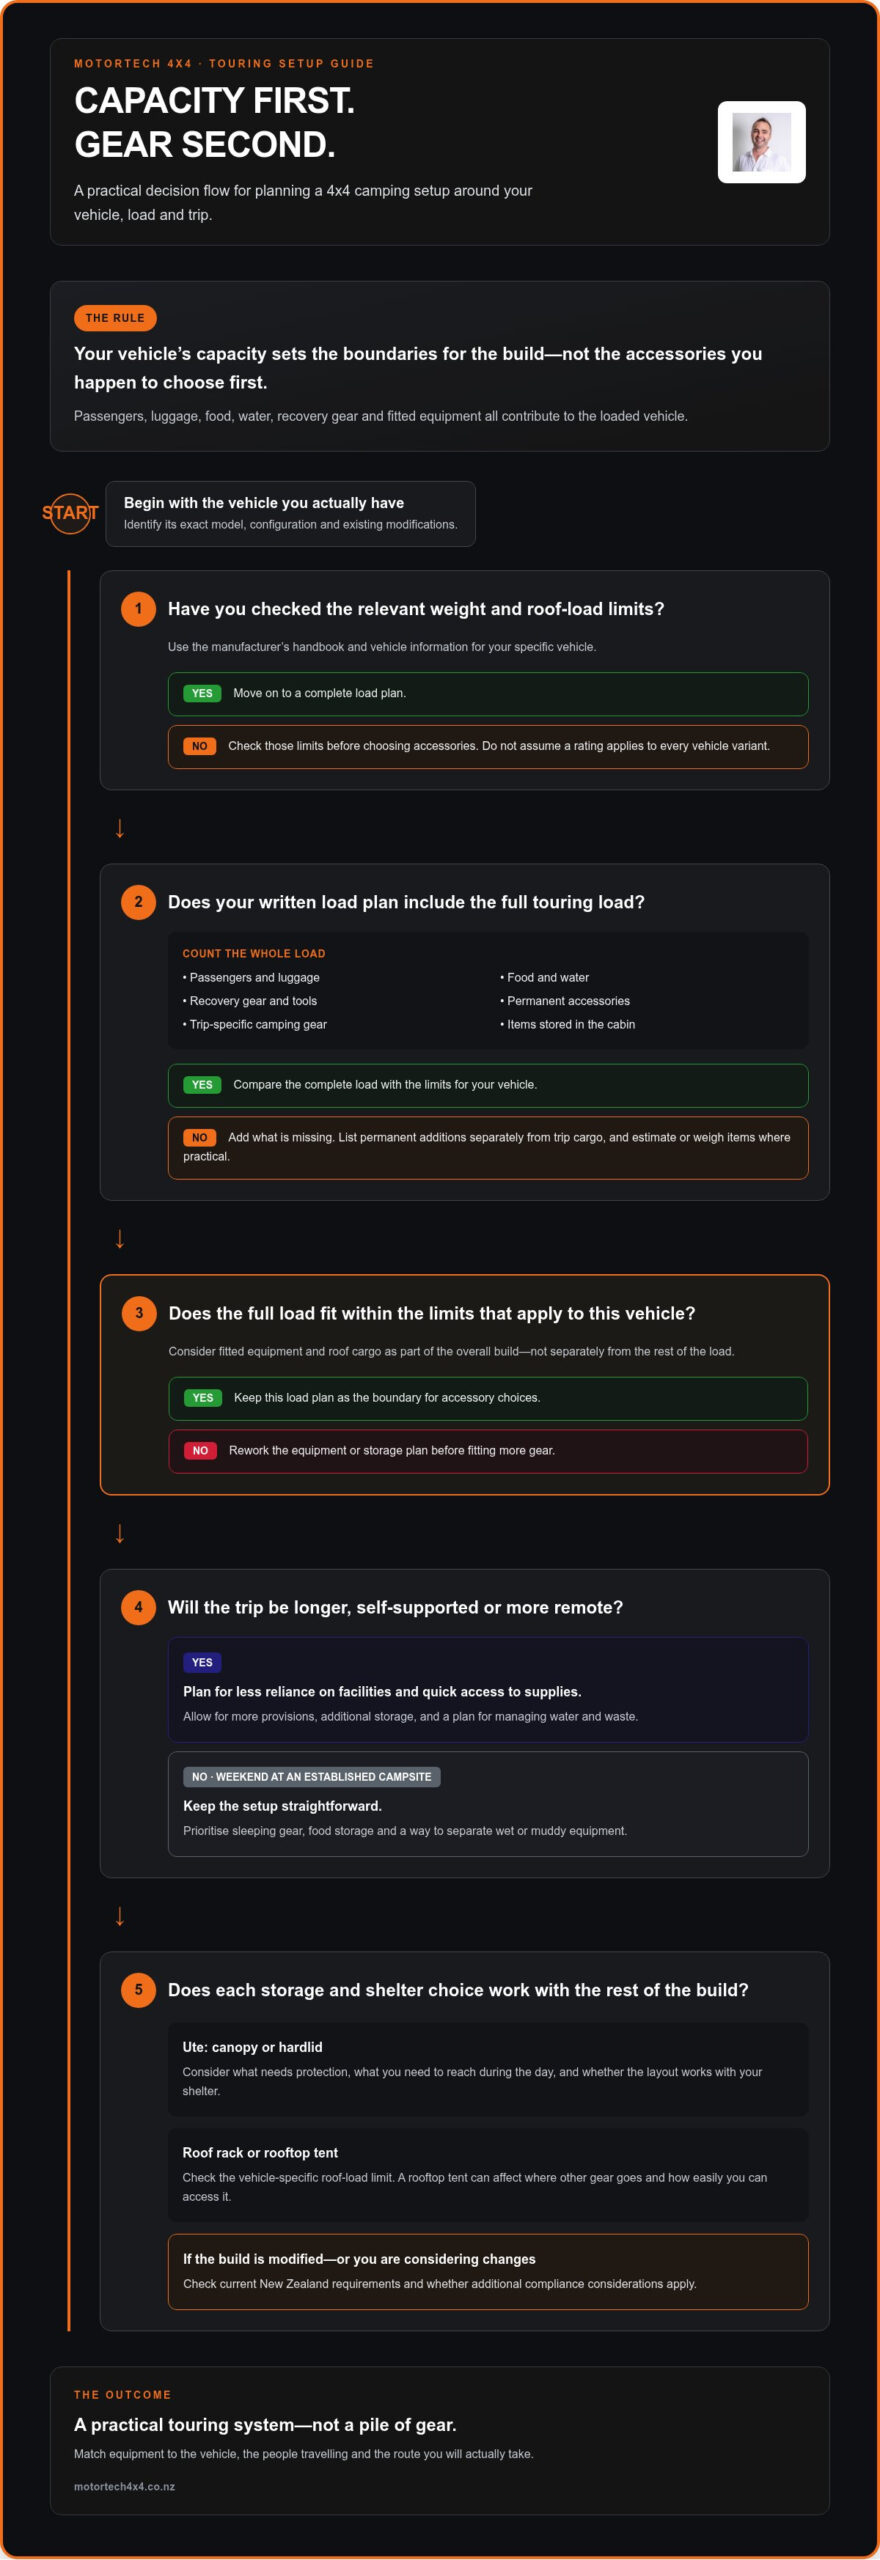
Vehicle capacity should set the boundaries for accessory choices, not become an afterthought once the gear is fitted. A touring build adds weight in several places: passengers, luggage, camping equipment and permanent accessories all contribute to the loaded vehicle. The goal is to carry what your trip needs while staying within the limits that apply to your specific vehicle.
Follow a clear sequence: identify the vehicle’s limits, define the trip requirements, plan storage, then choose compatible accessories. This helps prevent a common mismatch: selecting a shelter or storage system first, then discovering it leaves too little room or load capacity for the people and equipment travelling with you.
Map the vehicle and its available load
Start with the exact vehicle configuration, including its model and existing modifications. Check the manufacturer’s handbook and vehicle information for relevant weight and roof-load limits. Then consider the fully loaded touring vehicle, not just the accessories in isolation. Passengers, luggage, food, water, recovery gear and fitted equipment all contribute to the load.
Keep a written load plan. List permanent additions separately from trip-specific cargo, and estimate or weigh items where practical. Include equipment that’s easy to overlook, such as tools and items stored in the cabin. If the vehicle has been modified, or you’re considering changes that affect its weight or structure, check current New Zealand requirements and whether additional compliance considerations apply. Don’t assume a modification or load rating applies automatically to every vehicle variant.
Match storage and shelter to the build
For a ute, a canopy or hardlid affects how you divide and access the load. Consider what needs protection, what you’ll reach during the day and whether the layout works with your chosen shelter. A roof rack offers another way to carry equipment, but roof-load limits are specific to the vehicle and need to be considered alongside the rack and its cargo.
Think through how each item affects the rest of the build. A tent carried on the roof, for example, may change where other gear can go and how easily you can access it. Include heavier items in the overall load plan rather than treating them separately from the vehicle’s limits. For a broader gear-planning checklist, the guide to Essential Camping Gear 2026: The Ultimate Vehicle-Based Touring Guide can help you consider what to pack for vehicle-based travel.
Route choice matters, too. If your itinerary includes conservation land or off-road driving, review the DOC off-road driving guidelines and plan around the access conditions. Specialist input can help match accessories to your vehicle configuration. Motortech 4X4 supplies and installs 4×4 accessories in Auckland, helping turn touring priorities into a considered fitment plan. Explore 4×4 setup support as you plan your build.
Compare 4×4 camping setup options for New Zealand touring
There’s no single configuration that suits every traveller. A lightweight weekend build can keep the vehicle uncluttered, while a storage-focused ute or longer-touring setup may prioritise protected space and carrying capacity. Compare options against your vehicle, how often you travel and what you need to access easily. Don’t choose equipment just because it looks like a complete package.
| Setup approach | Storage access | Shelter needs | Vehicle fit | Best suited to |
|---|---|---|---|---|
| Lightweight weekend touring | Loose or compact storage keeps frequently used gear close at hand. | Portable shelter and bedding for short stays. | A practical option where the vehicle has limited cargo space or the load needs to stay simple. | Occasional trips and established campsites. |
| Storage-focused ute build | A canopy or hardlid can organise gear in the tray and provide a more contained storage area. | Shelter can be carried separately or selected to suit the vehicle arrangement. | Suited to utes where tray access and protected storage are priorities. | Regular trips with equipment that benefits from a consistent place in the vehicle. |
| Longer touring setup | Planned storage separates daily-use items from supplies packed for later. | Shelter and bedding must suit the trip length and people travelling. | Needs careful consideration of available load capacity and accessory compatibility. | Extended travel where more equipment may be required between stops. |
These are planning categories, not fixed recipes. A weekend traveller may still need protected storage, while a long tour might call for a lighter load if facilities are available along the route. Check New Zealand freedom camping regulations alongside local information when deciding where you’ll stay. Your camping arrangements affect which facilities and equipment the trip requires.
Choose a storage approach that suits your vehicle
An open tray offers direct access to cargo, but gear is more exposed to the elements unless it’s covered or stored separately. A canopy or hardlid changes how you organise the tray and reach equipment, so consider passenger space and which items you’ll need during the day. For rack options and fitment considerations, the guide Roof Racks NZ: The Ultimate Buying & Installation Guide for 2026 is a useful companion.
Prioritise accessories by trip frequency
Sort proposed equipment into three groups: essential for safe, workable trips; regularly useful; and occasional-use items. This helps you decide what deserves a permanent place on the vehicle and what can be packed only when needed. Roof-mounted gear uses vehicle-specific load capacity and may affect access to other equipment, so include it in the overall arrangement.
If you haven’t settled on shelter, use the related roof-top-tent-versus-ground-tent article for a focused comparison rather than trying to decide everything at once. A well-planned 4×4 camping setup NZ should reflect how often you’ll use each item, how it fits the vehicle and whether the complete arrangement works for your trips.
Prepare a safe, practical 4×4 camping setup for NZ conditions
A capable touring build still needs a pre-trip check. New Zealand routes can include sealed roads, gravel and restricted-access tracks, while weather and campsite conditions may change your plans. A consistent departure routine helps you catch issues with the route, vehicle or load before they become problems on the road.
Check routes, weather and campsite requirements
Research your intended route close to departure. Check current road access and conditions, review the forecast for the places you’ll travel and stay, and consider whether you’ll need an alternative route or overnight stop if conditions change. Don’t assume a public road, track or camping area is open to every vehicle.
Confirm campsite access, booking requirements, facilities and site-specific rules with the relevant land manager. Department of Conservation information and local council guidance can help clarify what applies at each destination. Freedom camping isn’t permitted everywhere, and vehicle access can be restricted. Plan an alternative rather than relying on an unverified stop.
Inspect the loaded vehicle before departure
Check the vehicle in its fully loaded touring condition. Confirm the load is within the manufacturer’s limits and secure luggage and equipment. Make sure cargo doesn’t obstruct the driver’s view, interfere with safe access to the cabin or shift during travel. Check tyres and general vehicle condition, and arrange servicing before a longer trip if maintenance is due.
Modifications can affect vehicle compliance. Before fitting or travelling with modified equipment, check current New Zealand requirements through relevant official guidance, including NZTA and LVVTA information where applicable. Don’t rely on a general rule of thumb for a vehicle with a particular modification. For servicing and modification context, the guide Auckland 4×4 Guide: Expert Modifications, Servicing, and Off-Road Gear offers related background.
Before departure, check the route and forecast, confirm campsite access and rules, inspect the vehicle, verify the loaded weight and secure every item. Repeat the checks if the itinerary changes or you add equipment, passengers or supplies. A changed load can affect how the vehicle is packed and whether it remains within the applicable limits.
- Review road access, route conditions and weather.
- Confirm campsite bookings, access and restrictions with the land manager.
- Check tyres, vehicle condition and servicing needs.
- Secure the load, preserve visibility and account for all passengers and gear.
- Review current official guidance for vehicle load limits and modifications.
Auckland drivers planning accessory fitment or pre-tour 4×4 servicing can plan a touring setup with Motortech 4X4, with vehicle use and compatibility considered as part of the build.
Plan and fit your 4×4 camping setup with an Auckland specialist
A specialist can help turn a rough gear list into a coordinated accessory and fitment plan. That means considering the vehicle, planned trips, storage layout and equipment you’ll use together, rather than treating each accessory as a separate purchase. Compatibility matters: a canopy, roof rack and camping gear all need to suit the vehicle and the way you intend to travel.
Motortech 4X4 is an Auckland retailer and service centre that supplies and installs 4×4 accessories. Canopies, roof racks and camping gear can be planned alongside 4×4 servicing, connecting accessory choices with the vehicle’s condition and touring use. Bring your priorities and questions to a setup-planning conversation, even if you’re still deciding which options suit your trips.
What to bring to a setup-planning conversation
Start with the basics: your vehicle model and configuration, current accessories, usual passengers and the kinds of trips you take. Explain whether you mostly use established campsites, travel for longer periods or carry equipment for activities along the way. These details help shape a build around your actual use instead of a generic touring checklist.
- A shortlist of the equipment you use often and what you’d like to add.
- Any concerns about storage access, passenger space or how gear is organised.
- Information about existing modifications and any load or compatibility questions.
- Your intended timing for accessory fitment and any servicing needs before touring.
The conversation can also identify dependencies. For example, the storage layout may affect where camping equipment is carried, while planned accessories may need to be considered alongside existing vehicle modifications. Sharing the full picture early makes it easier to plan the setup as a system.
Turn the plan into a staged touring build
A staged approach gives each decision a clear purpose. Put safety, vehicle compatibility and the equipment needed for your usual trips at the top of the plan. Then consider accessories that make regular use more convenient. Comfort additions and gear for occasional activities can follow once you know how the core arrangement works in practice.
This order can help prevent buying equipment that conflicts with a later choice or doesn’t suit the final layout. It also gives you a chance to review the vehicle as the build develops, including how accessories are fitted and whether servicing should be planned before a longer tour. A capable 4×4 camping setup NZ is built around the vehicle and your travel needs, not just a collection of add-ons.
For a considered accessory and fitment plan, plan your 4×4 camping setup with Motortech 4X4.
Make your first trip the start of a better touring build
Think of your first outing with the setup as a practical shakedown, not a final exam. Notice what you reach for often, what’s awkward to access and what stays packed throughout the trip. Those observations are more useful than adding extra gear based on guesswork. After the trip, adjust the layout and refine your priorities before investing in more equipment.
Your needs may change with the season, who’s travelling or the route you’re planning. Keep your 4×4 camping setup NZ flexible enough to suit those trips, while making sure each addition works with the vehicle and the rest of the build. A considered plan can develop over time, with compatibility and safe fitment guiding each next step.
Ready to shape your vehicle around the way you travel? Plan your 4×4 camping setup with Motortech 4X4.
Start with a clear plan, then make each trip count.
Frequently Asked Questions
Can I use any 4×4 for camping in New Zealand?
A 4×4 can be used for camping if it’s suitable for the access road and the campsite allows that vehicle. Four-wheel drive alone doesn’t guarantee clearance, traction or safe access on rough tracks. A family campsite reached by sealed road may suit a standard 4×4, while a remote route could call for different vehicle capability. Check your vehicle handbook and the specific route conditions before setting out.
Do I need a 4WD to camp around New Zealand?
No, a 4WD isn’t necessary for every New Zealand camping trip. Many established campsites can be reached by two-wheel-drive vehicles, depending on road conditions and site access. Choose your vehicle based on where you intend to travel, rather than assuming you’ll need off-road capability for every destination. If your plans include gravel roads or tracks, check their condition and access requirements, then decide whether your vehicle is suitable.
How do I check whether a campsite allows my vehicle?
Check the campsite’s current information with its land manager or operator, then look for vehicle-access restrictions, closures, booking conditions and camping rules. Department of Conservation sites and local council areas can have different requirements. If you’re considering freedom camping, check the rules for the exact location and whether your vehicle must meet self-containment requirements. Don’t rely on an old listing or assume access for one vehicle type applies to all.
Can I sleep in a 4×4 without a rooftop tent?
Yes, you can sleep inside a 4×4 or use a ground-based shelter instead of a rooftop tent. First check that the vehicle’s interior can accommodate the people sleeping in it, with room for bedding and essential belongings. Consider how you’ll ventilate the sleeping area, keep exits clear and manage gear overnight. If you’re staying at a campsite, confirm that the site permits your chosen arrangement and follow its rules.
How much gear can I carry in my 4×4?
Use the vehicle manufacturer’s information to identify its load limits, then account for people, luggage and fitted accessories as well as camping equipment. Don’t estimate capacity from the empty cargo area alone. Make a list of the loaded items, then compare the total with the applicable vehicle limits. If you’re unsure how a modification affects capacity, get advice specific to your vehicle before adding more gear.
What should I check before taking a 4×4 camping?
As well as checking your route and campsite, inspect items that can affect safe travel: tyre condition and pressures, spare tyre, lights, wipers, brakes and fluid levels. Confirm tools and equipment are secured, and that the driver’s view is clear. For a longer journey, consider whether the vehicle is due for maintenance before you leave. A short local test drive with the loaded vehicle can reveal awkward access or shifting cargo.
Can I fit a canopy and roof rack to the same 4×4?
A canopy and roof rack can form part of the same touring build, but compatibility depends on the vehicle, canopy and rack configuration. Consider how the components fit together, whether the rack affects access to the canopy and how their combined weight affects the vehicle’s limits. Confirm the roof-load rating and relevant fitting requirements for your specific vehicle before installation. A matched setup helps avoid choosing components in isolation.