The most expensive canopy in the world is essentially useless if you’re still fumbling for a headlamp every time the sun goes down. Most owners invest heavily in suspension and bullbars, yet they leave their cargo area in the dark, literally. If you’re tired of poor visibility or messy DIY wiring that rattles loose on corrugated tracks, you need a professional approach to 4×4 canopy lighting ideas.
We agree that a functional canopy is the heart of any work or adventure rig. You need a setup that illuminates every corner without blinding you or attracting every insect in the bush. This guide provides the expertise you need to achieve a clean, reliable lighting system that serves a dual purpose for both the job site and the campsite.
We’ll explore how to integrate smart power management to prevent battery drain and discuss the benefits of dual-colour LED technology. By the end of this article, you’ll know exactly how to organise your lighting for maximum efficiency and long-term durability.
Key Takeaways
- Understand why light placement and beam patterns are more critical than raw lumen output for visibility in confined canopy spaces.
- Explore various 4×4 canopy lighting ideas, including internal hard-wired bars and flexible LED tape, to suit different canopy designs.
- Learn why a dedicated dual-battery system and DC-DC charger are essential for maintaining battery health and powering your rig off-grid.
- Identify the structural risks of DIY wiring on corrugated tracks and why professional-grade connections are vital for vehicle safety.
- Discover how a professional fit-out ensures a clean, reliable, and integrated lighting solution tailored for both work and adventure.
The Fundamentals of 4×4 Canopy Lighting: Why Lumens Aren’t Everything
Many owners make the mistake of chasing the highest possible lumen count when researching 4×4 canopy lighting ideas. While raw brightness is vital for a high-beam light bar on a bullbar, inside a confined, often white-painted canopy, excessive output creates debilitating glare. Understanding automotive lighting fundamentals is essential here; it’s about the quality and distribution of light rather than just the intensity. If you install a high-output spot beam inside your cargo area, you’ll end up with harsh “hot spots” and deep shadows that make it harder to find what you’re looking for.
The distinction between flood and spot patterns is critical. In a canopy, you need a wide-angle flood pattern that washes the entire space in even light. This reduces eye strain and ensures that the dark corners behind your fridge slide or drawer system are properly illuminated. For those using their rig for work, a high Colour Rendering Index (CRI) is a technical requirement you shouldn’t ignore. A high CRI allows you to distinguish between different coloured wires or tool markings accurately, which is a lifesaver during a late-night roadside repair.
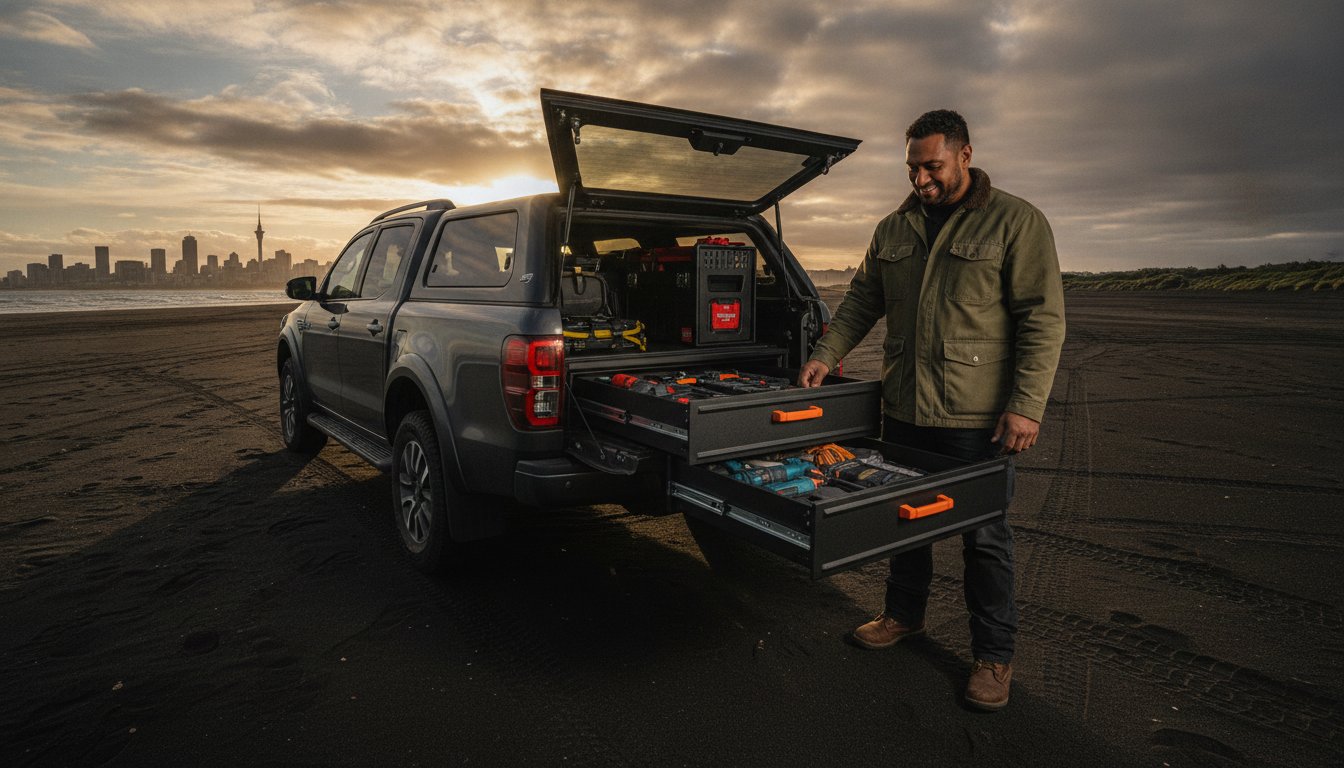
Your specific use case will dictate your final setup. A “tradie” rig requires high-intensity, clear light for identifying parts and reading plans. Conversely, a “tourer” needs a more versatile system that supports both food preparation and relaxed socialising without the clinical feel of a surgery ward. Achieving this balance is what separates a professional fit-out from a basic DIY job.
Cool White vs. Warm White vs. Amber
Colour temperature, measured in Kelvin (K), significantly impacts how you use your space. Cool white (6000K+) provides maximum contrast and is ideal for detail-oriented work. However, it can feel harsh during a long camping trip. Warm white offers a softer, more natural glow that’s easier on the eyes during a meal. The real game-changer for Australian and Kiwi campers is amber lighting. Insects are less attracted to the specific wavelength of amber light, meaning you can keep your canopy doors open at night without inviting a swarm of moths and mosquitoes inside your sleeping or cooking area.
Understanding IP Ratings for Canopy Environments
Durability in the 4×4 world is defined by IP (Ingress Protection) ratings. For any 4×4 canopy lighting ideas that involve mounting lights on the exterior or near the tailgate, IP67 or IP68 is a non-negotiable standard. These ratings ensure the unit is completely dust-tight and can handle immersion in water. Auckland’s humid, salty coastal air is particularly aggressive; it will quickly corrode the internal circuitry of cheap, low-rated LED strips. Professional installations focus on sealed connections and high-grade housings to prevent moisture ingress from ruining your electronics within a single season.
Top 4×4 canopy lighting ideas for every setup
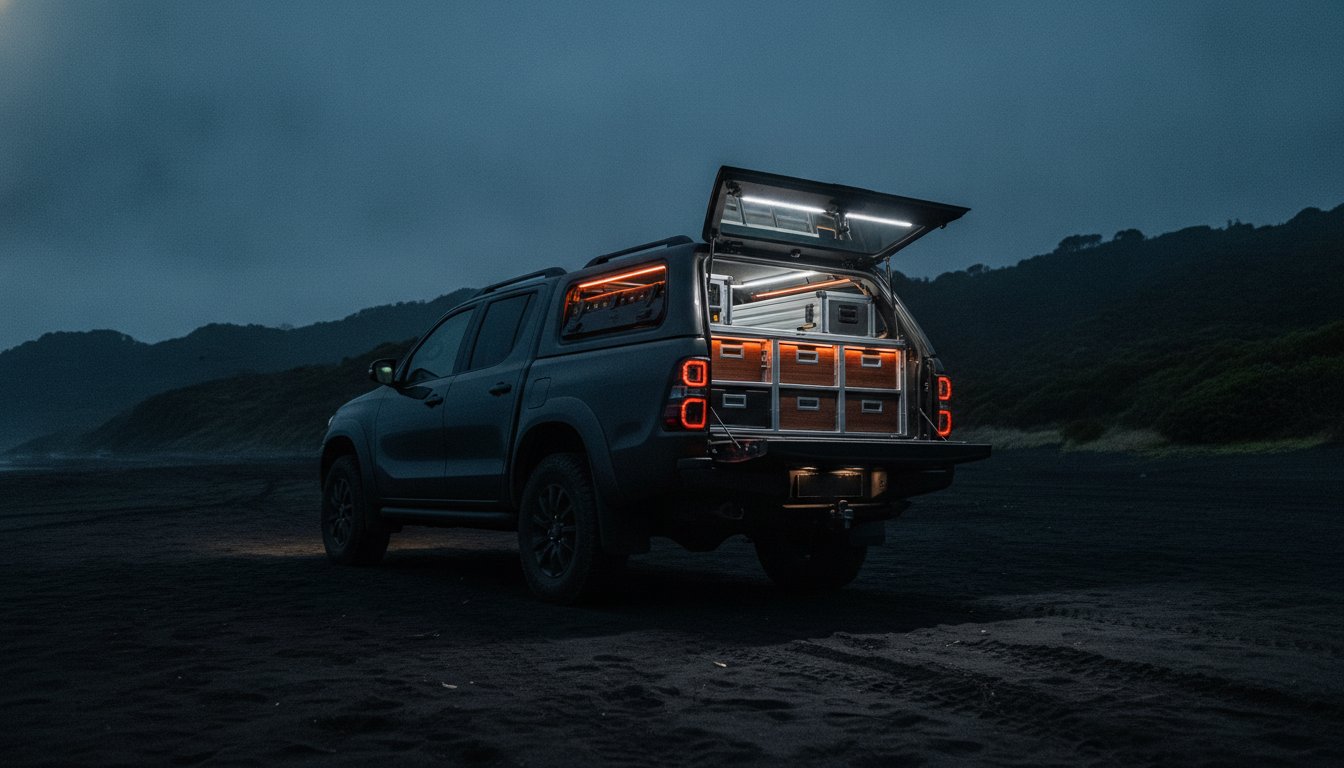
Effective illumination requires more than just sticking a battery-powered puck to the roof. To build a truly functional rig, you need integrated 4×4 canopy lighting ideas that withstand the vibration of corrugated tracks and the dust of the outback. A professional finish starts with internal hard-wired LED bars. These units provide a permanent, vibration-resistant solution that integrates directly into your vehicle’s 12V system. Unlike temporary options, hard-wired bars offer superior heat dissipation and a cleaner aesthetic that matches the quality of a high-end canopy build.
Flexible LED tape is an excellent alternative for specific geometries. If your canopy features curved surfaces or glass doors, rigid bars might not fit. High-quality, waterproof LED strips can be recessed into aluminium extrusions to provide a sleek, low-profile look. For those who frequently access their gear with full hands, motion-activated sensors are a game-changer. These small, 12V-compatible PIR sensors trigger your internal lights as soon as a door opens, removing the need to fumble for switches in the dark.
Tailgate lighting is another critical area often overlooked. Mounting a dedicated LED bar or a pair of small floodlights to the underside of the rear door provides a focused workspace directly behind the ute. This setup is invaluable for tradies packing up a job site at dusk or tourers preparing a meal on a drop-down table. If you’re planning a comprehensive upgrade, our technicians can help you design and install a custom vehicle lighting system that meets your specific requirements.
Internal Layout Ideas: No More Shadows
Positioning is everything. Mounting lights on the roof ribs provides a broad overhead wash, but it can create shadows if you have tall drawers or a fridge. A better approach is to mount lights on the side doors or use 45-degree angled extrusions. These extrusions direct light deep into toolboxes and drawer systems, ensuring you aren’t digging through dark corners. Integrating lights into the underside of lift-up doors also provides excellent perimeter lighting when the canopy is open.
External and Perimeter Lighting
Safety around the vehicle is just as important as visibility inside it. Rock lights, traditionally used for underbody visibility during night-time technical driving, serve as perfect perimeter “puddle” lights when mounted to the side of a canopy or roof rack. They illuminate the ground around the vehicle, preventing trips on guy ropes or uneven terrain. High-mounted floodlights on the rear or sides are essential for night-time recoveries or setting up a complex job site. For a more relaxed atmosphere, dimmable awning lights allow you to dial back the intensity for a quiet evening at the campsite.
Powering Your Setup: Dual Batteries and Smart Switching
Implementing effective 4×4 canopy lighting ideas requires more than just high-quality LEDs; it demands a robust electrical foundation. Relying on your vehicle’s primary starter battery to power an entire canopy setup is a high-risk strategy that often leads to a stranded vehicle in the bush. A dedicated dual-battery system is the industry standard for any serious build. It isolates your accessories from your starting circuit, ensuring you always have the cranking power needed to get home after a long weekend off-grid.
The heart of this system is the DC-DC charger. Modern vehicles equipped with smart alternators often fail to provide the consistent voltage required to fully charge an auxiliary battery. A DC-DC charger acts as a sophisticated regulator, ensuring your second battery, whether it’s Lead Acid, AGM, or Lithium, receives the correct charging profile. This is essential for maintaining battery health on long trips where constant draw from fridges and lights is unavoidable. Protecting this investment requires high-quality circuit breakers and fuses. We never recommend “twist and tape” connections; instead, every circuit must be properly terminated and protected against the vibration fatigue common on corrugated tracks.
Centralising your control is the final step in a professional fit-out. While traditional rocker switch panels offer a rugged, tactile feel, many owners now opt for smart Bluetooth hubs. These systems allow you to manage your entire 12V ecosystem via a smartphone app or a central touchscreen, providing real-time data on battery levels and power consumption. This level of integration turns a collection of parts into a cohesive, manageable system.
Managing Battery Draw
Calculating your total amp-hour (Ah) draw is a simple but vital task. While LEDs are incredibly efficient, a large array of internal bars, external floodlights, and puddle lights can still add up over a long evening. For example, a standard high-output LED strip might draw 1.2 amps per metre. If you run five metres of lighting for four hours, that’s 24Ah consumed from your storage. Using low-voltage disconnects provides an automated failsafe, cutting power to your lights before the auxiliary battery drops to a damaging level of discharge.
Switching and Dimming Options
Customisation is key to a functional rig. Flush-mount rocker switches provide a factory-finished look inside the canopy and are easy to operate with work gloves on. For those who want more control, remote-controlled dimmers allow you to adjust the intensity of your 4×4 canopy lighting ideas from the comfort of your swag. This versatility ensures you can switch from high-intensity work lighting to a dim, amber-hued ambient glow without needing to reach for a physical switch panel in the dark.
Installation Standards: Professional Fit-Out vs. DIY
Executing your 4×4 canopy lighting ideas requires a level of precision that goes beyond basic electrical work. While many owners are tempted to tackle the wiring themselves, the reality of New Zealand’s driving conditions often exposes the flaws in a DIY approach. Corrugated tracks, particularly in remote areas of the North and South Islands, subject vehicle electronics to relentless vibration. This vibration fatigue is the primary cause of connection failure; it leads to flickering lights or a complete system blackout when you’re miles from the nearest workshop.
Professional standards dictate that “twist and tape” connections have no place in a modern 4×4. These low-quality joins represent a significant fire risk. They can loosen over time, create high resistance, and eventually generate enough heat to ignite nearby materials. A professional installation utilises high-quality crimp connectors or soldered joins protected by dual-wall heat shrink. Proper cable management is also essential. Using split-loom conduit and rubber grommets where wires pass through metal panels ensures that your harness is protected from abrasion and environmental damage.
The Professional Wiring Standard
In Auckland’s humid and salty coastal environment, standard copper wire is prone to internal corrosion. We insist on using tinned copper wire for all 12V fit-outs because the thin layer of tin provides a critical barrier against oxidation. Proper grounding is also vital to avoid “ghosting,” where LED bars remain dimly lit even when switched off. A professional installer will always document the circuit layout and label the fuse box. This makes future troubleshooting or expansions a straightforward process rather than a guessing game.
Integrating with Your Canopy Brand
Every canopy material presents unique challenges. Aluminium canopies are excellent for mounting rigid bars but require careful isolation to prevent galvanic corrosion. Fibreglass units often need internal support structures or specific adhesive-backed mounting to avoid drilling through the shell. Drilling can easily compromise the structural integrity of the canopy. We focus on finding hidden wiring paths that maintain the factory-sealed finish of your unit. It is vital that any lighting installation does not interfere with canopy seals or locking mechanisms. A small gap can allow dust and water to ruin your expensive gear. For a build that stands up to the harshest NZ conditions, contact our team for a professional fleet fit-out or custom canopy solution.
Motortech 4X4: Custom Canopy Lighting Solutions in Auckland
Motortech 4X4 operates as a comprehensive service provider in Auckland, offering a specialised “One-Stop Shop” approach to vehicle modifications. We don’t just sell components; we engineer integrated solutions that enhance both the utility and performance of your rig. When you are researching 4×4 canopy lighting ideas, you need a partner who understands how these systems interact with your vehicle’s structural and electrical integrity. Our team of seasoned 4×4 mechanics brings workshop precision to every project, ensuring that your lighting setup is as rugged as your suspension.
For Auckland tradies, reliability is the primary metric for any gear. A flickering light or a failed switch on a job site is a liability that costs time and money. We specialise in tailored layouts that provide high-intensity, shadow-free illumination for toolboxes and work surfaces. By combining your lighting fit-out with other essential modifications, such as GVM upgrades or the initial canopy installation, we ensure that the entire build is balanced and professionally executed from day one. This holistic approach prevents the common issues seen in piecemeal builds, such as overloaded circuits or compromised seals.
Why Choose Professional Installation?
Professional work provides more than just a clean aesthetic. It offers the peace of mind that comes with compliant, safe, and warrantied electrical systems. DIY kits often rely on generic components that struggle with the high-vibration environment of off-roading. At Motortech 4X4, we use premium industry-leading hardware and heavy-duty wiring techniques that standard kits simply cannot match. Every circuit is planned to avoid interference with other vehicle systems, protecting your sensitive modern electronics and ensuring long-term durability in harsh NZ conditions.
Book Your Canopy Consultation
Building a high-performance rig starts with a professional consultation. We invite you to visit our Auckland centre to have a hands-on look at our 4×4 canopy lighting ideas and see the quality of our installations first-hand. Our specialist team is available to discuss your dual-battery requirements, storage needs, and long-term goals for the vehicle. We take a methodical approach to every build, ensuring that your lighting integrates seamlessly with your camping gear and professional equipment. To get started on your project, organise your custom canopy lighting quote at Motortech 4X4 today.
Build a Rig That Never Leaves You in the Dark
Achieving the perfect balance between a high-performance work vehicle and a comfortable adventure rig starts with technical precision. You’ve seen that the most effective 4×4 canopy lighting ideas aren’t just about finding the brightest LEDs; they rely on strategic placement, appropriate colour temperatures, and a rock-solid dual-battery foundation. Whether you’re a tradie needing shadow-free tool access or a tourer wanting an insect-free campsite, your electrical system must be built to withstand the relentless vibrations of corrugated tracks.
Motortech 4X4 brings expert fleet fit-out experience and precision mechanical standards to every build we undertake. As an Auckland specialised 4×4 service centre, we ensure your wiring is vibration-resistant and your power management is intelligent. We focus on delivering a clean, reliable setup that protects your investment and ensures you’re never left fumbling in the dark. Don’t risk a dead battery or a failed circuit when you’re far off the grid.
Get a Professional Canopy Lighting Quote from Motortech 4X4
We look forward to helping you transform your ute into the ultimate multi-purpose tool for both the job site and the great outdoors.
Frequently Asked Questions
Will canopy lights drain my main car battery?
Yes, any accessory powered by your primary starter battery will eventually drain it if the engine isn’t running. While modern LEDs are highly efficient, leaving them on for extended periods can drop the voltage below the level required to crank the engine. To avoid being stranded in the bush, we recommend a dual-battery system that isolates your lighting and accessories from your starting circuit.
What is the best colour light for camping to avoid bugs?
Amber light is the most effective option for minimising insect attraction at your campsite. Most bugs are drawn to the UV and blue light spectrums found in cool white LEDs. By using amber-hued 4×4 canopy lighting ideas, you significantly reduce the swarm around your cooking and sleeping areas while still maintaining sufficient visibility for camp tasks.
Can I install canopy lights myself if I have a basic 12V kit?
You can perform a DIY install, but it carries risks regarding reliability and safety. Standard 12V kits often use low-grade wiring and “twist and tape” connections that fail under the vibration of corrugated tracks. A professional installation ensures the use of tinned copper wire and vibration-proof joins, which are critical for preventing electrical shorts and potential vehicle fires.
Do I need a dual battery system for just a few LED strips?
A dual-battery system isn’t strictly mandatory for a single LED strip, but it’s highly recommended for any permanent rig. Even a small current draw adds up over a long weekend when the engine isn’t charging the battery. Having a dedicated auxiliary power source provides the peace of mind that your starter battery remains fully charged for the trip home.
What are the best IP ratings for off-road vehicle lighting?
Look for a minimum of IP67 or IP68 for any lighting mounted on the exterior or near the tailgate. An IP67 rating means the unit is completely dust-tight and can withstand water immersion up to one metre. IP68 offers even greater protection for deeper immersion, which is vital for vehicles frequently tackling water crossings or Auckland’s intense coastal weather.
How do I hide the wiring in my aluminium canopy?
Hiding wiring in aluminium structures is best achieved by using internal extrusions or split-loom conduit tucked into the frame’s corners. We use rubber grommets wherever a wire passes through a metal panel to prevent sharp edges from chafing the insulation. This methodical approach keeps the 4×4 canopy lighting ideas looking professional while protecting the harness from vibration-induced damage.
Are LED light bars better than flexible strips for internal lighting?
Rigid LED bars are generally superior for internal canopy use because they offer better heat dissipation and a more permanent mounting solution. Flexible strips are useful for curved surfaces, but their adhesive backing can fail in high temperatures or dusty conditions. For a professional, long-term fit-out, hard-wired rigid bars provide a much more reliable and finished appearance.
Can you integrate canopy lighting with my factory remote central locking?
Yes, we can integrate your lighting with the factory central locking or door switches. This allows your internal canopy lights to activate automatically as soon as the vehicle is unlocked or a door is opened. It’s a practical solution for tradies and campers who frequently access their cargo area with full hands and don’t want to fumble for a manual switch.